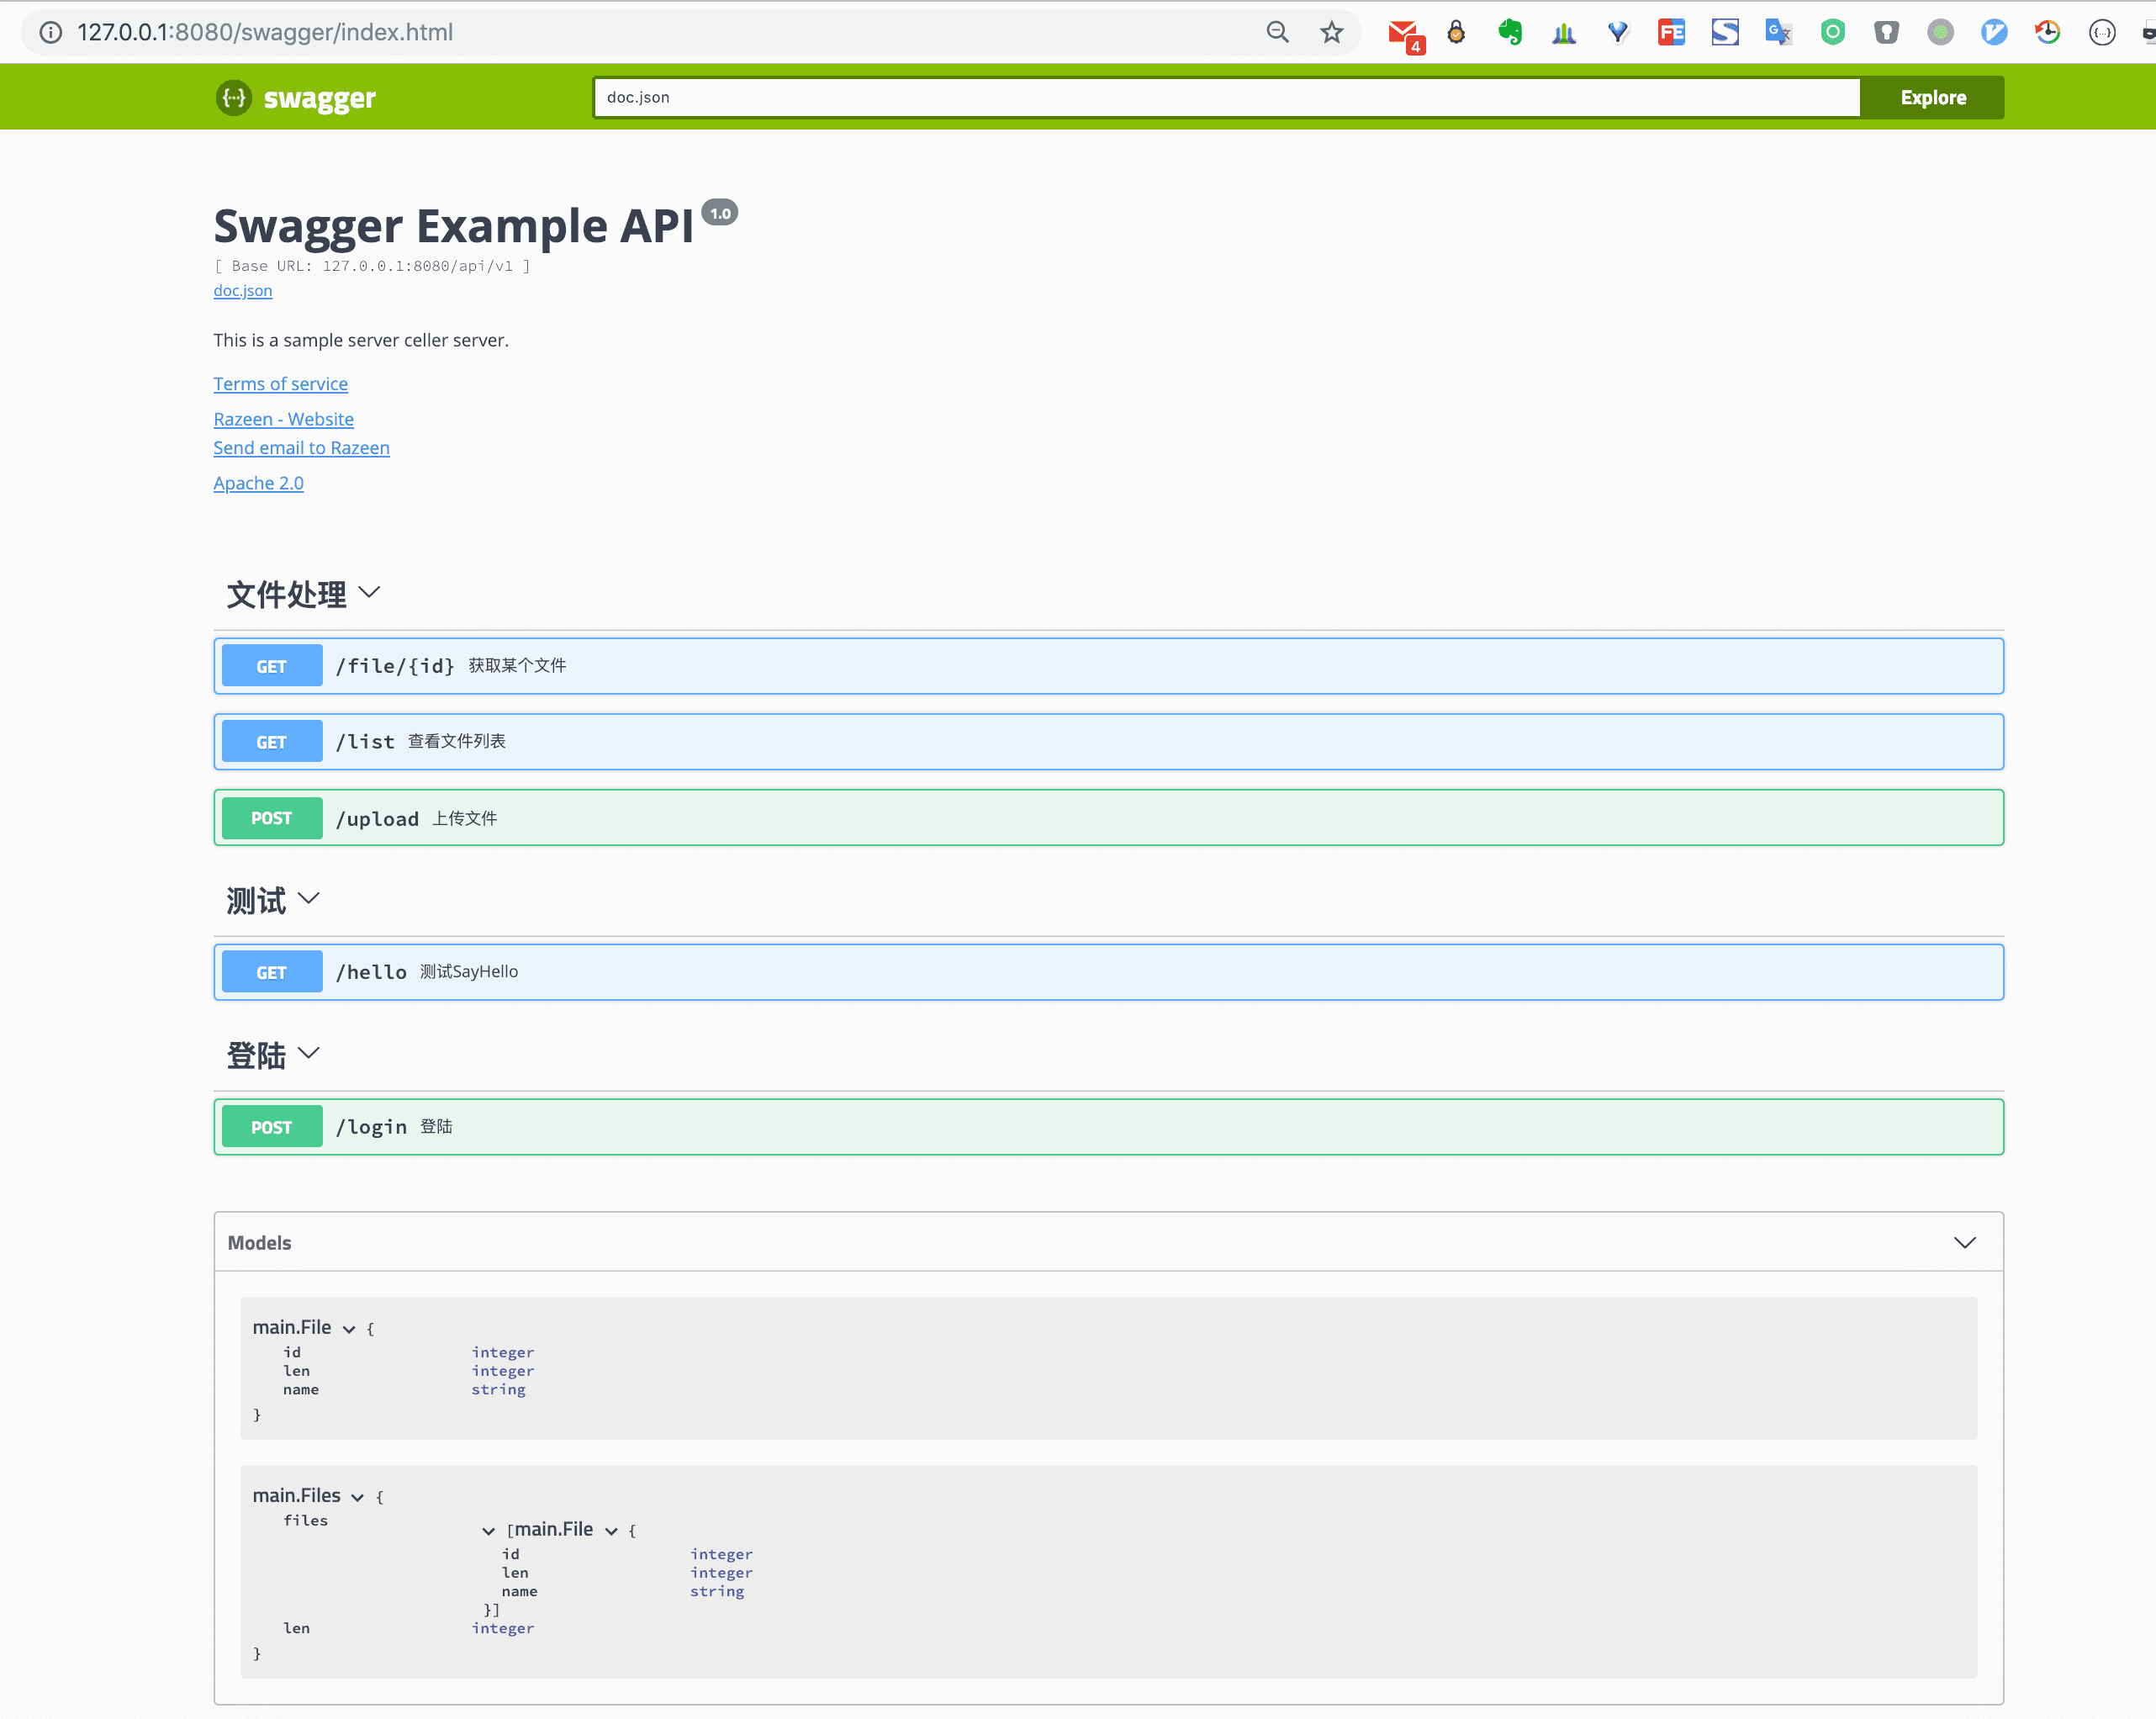
Swag

Swaggo

swaggo

1.1.1关于Swaggo

目前swaggo主要实现了swagger 2.0 的以下部分功能:

  • 基本结构(Basic Structure)
  • API 地址与基本路径(API Host and Base Path)
  • 路径与操作 (Paths and Operations)
  • 参数描述(Describing Parameters)
  • 请求参数描述(Describing Request Body)
  • 返回描述(Describing Responses)
  • MIME 类型(MIME Types)
  • 认证(Authentication)
    • Basic Authentication
    • API Keys
  • 添加实例(Adding Examples)
  • 文件上传(File Upload)
  • 枚举(Enums)
  • 按标签分组(Grouping Operations With Tags)
  • 扩展(Swagger Extensions)

下文内容均以gin-swaggo为例 这里是demo地址

1.1.2. 使用

安装swag cli 及下载相关包

要使用swaggo,首先需要安装swag cli。

1
go get -u github.com/swaggo/swag/cmd/swag

然后我们还需要两个包。

1
2
3
4
# gin-swagger 中间件
go get github.com/swaggo/gin-swagger
# swagger 内置文件
go get github.com/swaggo/gin-swagger/swaggerFiles

在main.go内添加注释

1
2
3
4
5
6
7
8
9
10
11
12
13
14
15
16
17
18
19
20
21
22
23
24
25
26
27
28
29
30
31
32
33
34
35
36
37
38
39
40
41
42
43
44
45
package main

import (
"net/http"

"github.com/gin-gonic/gin"
_ "github.com/student/0509/docs"
ginSwagger "github.com/swaggo/gin-swagger"
"github.com/swaggo/gin-swagger/swaggerFiles"
)

// @title Swagger Example API
// @version 1.0
// @description This is a sample server celler server.
// @termsOfService https://www.topgoer.com

// @contact.name www.topgoer.com
// @contact.url https://www.topgoer.com
// @contact.email me@razeen.me

// @license.name Apache 2.0
// @license.url http://www.apache.org/licenses/LICENSE-2.0.html

// @host 127.0.0.1:8080
// @BasePath /api/v1

func main() {

r := gin.Default()

r.GET("/swagger/*any", ginSwagger.WrapHandler(swaggerFiles.Handler))

v1 := r.Group("/api/v1")
{
v1.GET("/hello", HandleHello)
// v1.POST("/login", HandleLogin)
// v1Auth := r.Use(HandleAuth)
// {
// v1Auth.POST("/upload", HandleUpload)
// v1Auth.GET("/list", HandleList)
// }
}

r.Run(":8080")
}

如上所示,我们需要导入

1
2
ginSwagger "github.com/swaggo/gin-swagger"
"github.com/swaggo/gin-swagger/swaggerFiles"

添加注释:

  • title:文档标题
  • version:版本
  • description,termsOfService,contact...这些都是一些声明,可以不写
  • license.name:必须
  • host,BasePath:
  • securityDefinitions.basic,securityDefinitions.apikey

到这里,我们在mian.go同目录下执行swag init就可以自动生成文档,如下:

1
2
3
4
5
6
E:\goproject\src\github.com\topgoer>swag init
2020/05/13 16:28:02 Generate swagger docs....
2020/05/13 16:28:02 Generate general API Info, search dir:./
2020/05/13 16:28:02 create docs.go at docs/docs.go
2020/05/13 16:28:02 create swagger.json at docs/swagger.json
2020/05/13 16:28:02 create swagger.yaml at docs/swagger.yaml

然后我们在main.go导入这个自动生成的docs包,运行:

1
2
3
4
5
6
7
8
9
10
11
12
13
14
15
16
17
18
19
20
21
22
23
package main

import (
"github.com/gin-gonic/gin"
ginSwagger "github.com/swaggo/gin-swagger"
"github.com/swaggo/gin-swagger/swaggerFiles"

_ "github.com/razeencheng/demo-go/swaggo-gin/docs"
)

// @title Swagger Example API
// @version 1.0
// ...
E:\goproject\src\github.com\topgoer>go run main.go
[GIN-debug] [WARNING] Creating an Engine instance with the Logger and Recovery middleware already attached.

[GIN-debug] [WARNING] Running in "debug" mode. Switch to "release" mode in production.
- using env: export GIN_MODE=release
- using code: gin.SetMode(gin.ReleaseMode)

[GIN-debug] GET /swagger/*any --> github.com/swaggo/gin-swagger.CustomWrapHandler.func1 (3 handlers)
[GIN-debug] GET /api/v1/hello --> main.HandleHello (3 handlers)
[GIN-debug] Listening and serving HTTP on :8080

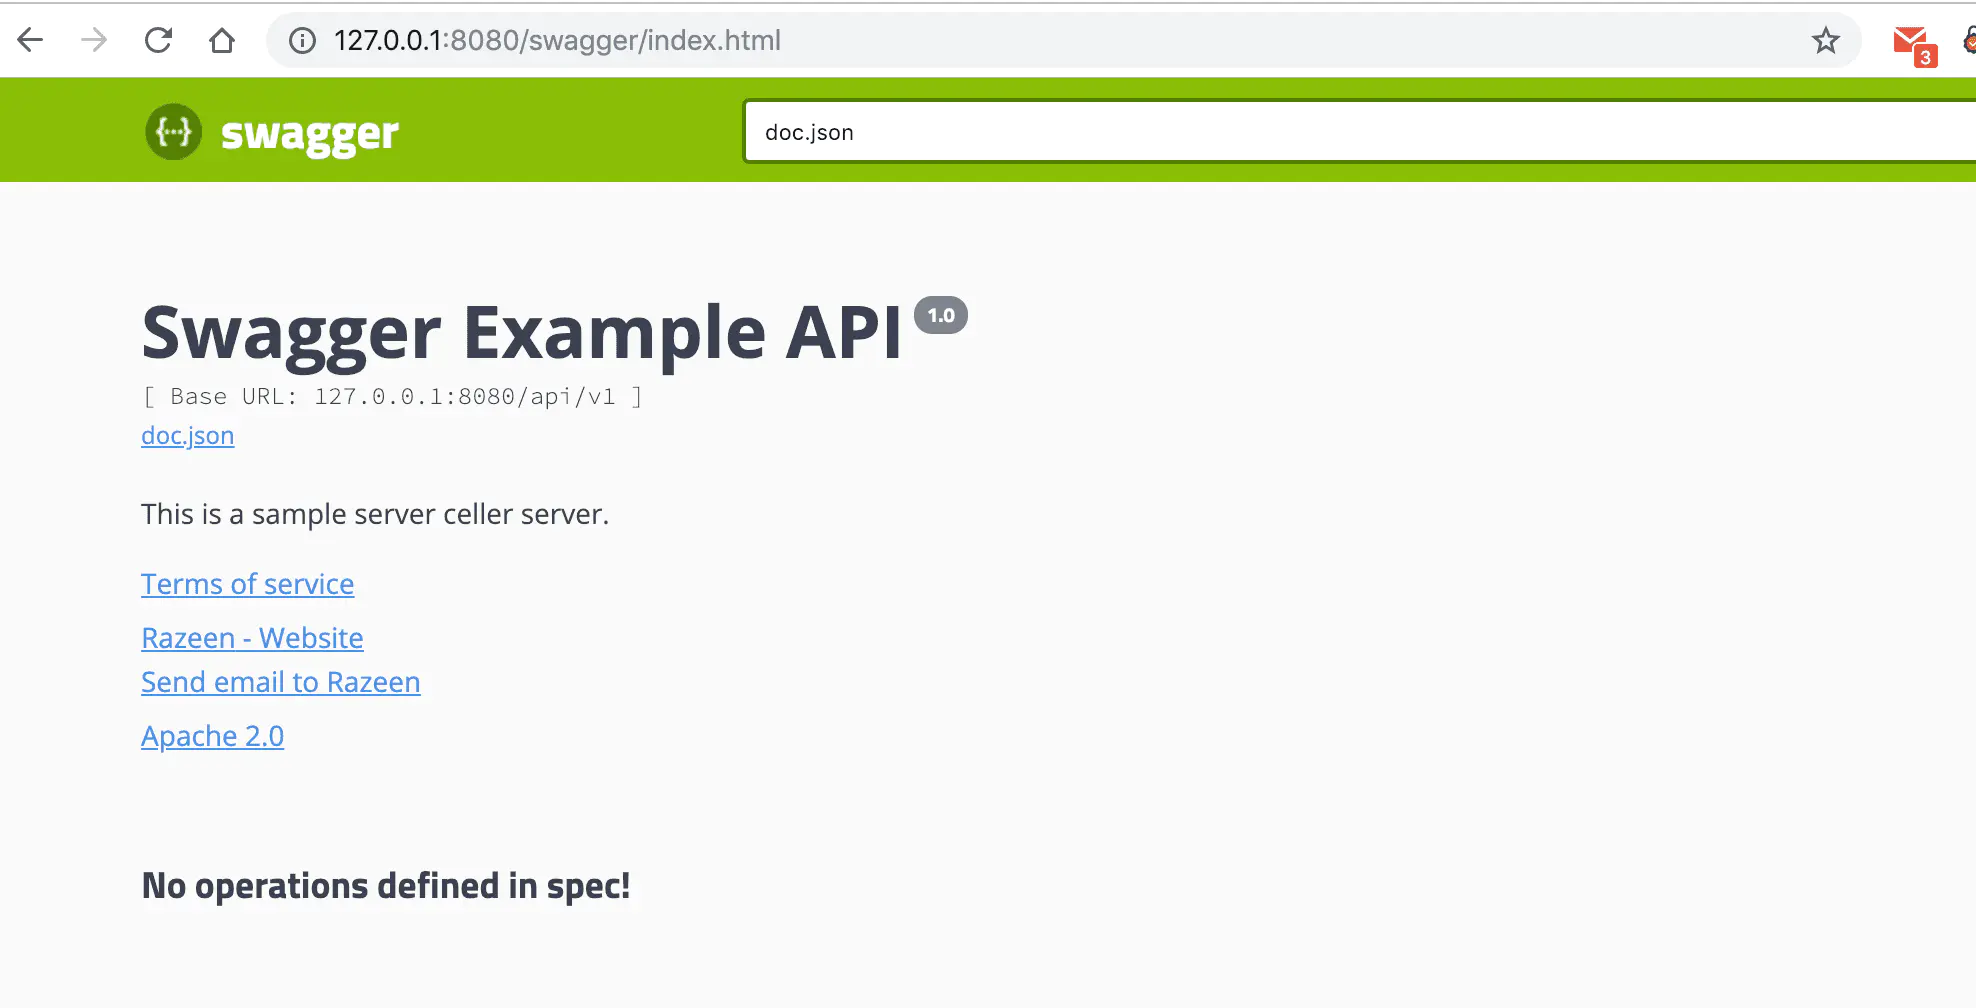
浏览器打开http://127.0.0.1:8080/swagger/index.html, 我们可以看到如下文档标题已经生成。swaggo
1.1.3. 在Handle函数上添加注释

接下来,我们需要在每个路由处理函数上加上注释,如:

1
2
3
4
5
6
7
8
9
10
11
12
13
14
15
16
17
18
19
20
21
22
23
24
25
26
27
28
29
30
31
32
33
34
35
36
37
38
39
40
41
42
43
44
45
46
47
48
49
50
51
52
53
54
55
56
57
58
59
60
61
62
63
64
package main

import (
"net/http"

"github.com/gin-gonic/gin"
_ "github.com/student/0509/docs"
ginSwagger "github.com/swaggo/gin-swagger"
"github.com/swaggo/gin-swagger/swaggerFiles"
)

// @title Swagger Example API
// @version 1.0
// @description This is a sample server celler server.
// @termsOfService https://www.topgoer.com

// @contact.name www.topgoer.com
// @contact.url https://www.topgoer.com
// @contact.email me@razeen.me

// @license.name Apache 2.0
// @license.url http://www.apache.org/licenses/LICENSE-2.0.html

// @host 127.0.0.1:8080
// @BasePath /api/v1

func main() {

r := gin.Default()

r.GET("/swagger/*any", ginSwagger.WrapHandler(swaggerFiles.Handler))

v1 := r.Group("/api/v1")
{
v1.GET("/hello", HandleHello)
// v1.POST("/login", HandleLogin)
// v1Auth := r.Use(HandleAuth)
// {
// v1Auth.POST("/upload", HandleUpload)
// v1Auth.GET("/list", HandleList)
// }
}

r.Run(":8080")
}

// @Summary 测试SayHello
// @Description 向你说Hello
// @Tags 测试
// @Accept json
// @Param who query string true "人名"
// @Success 200 {string} string "{"msg": "hello Razeen"}"
// @Failure 400 {string} string "{"msg": "who are you"}"
// @Router /hello [get]
func HandleHello(c *gin.Context) {
who := c.Query("who")

if who == "" {
c.JSON(http.StatusBadRequest, gin.H{"msg": "who are u?"})
return
}

c.JSON(http.StatusOK, gin.H{"msg": "hello " + who})
}

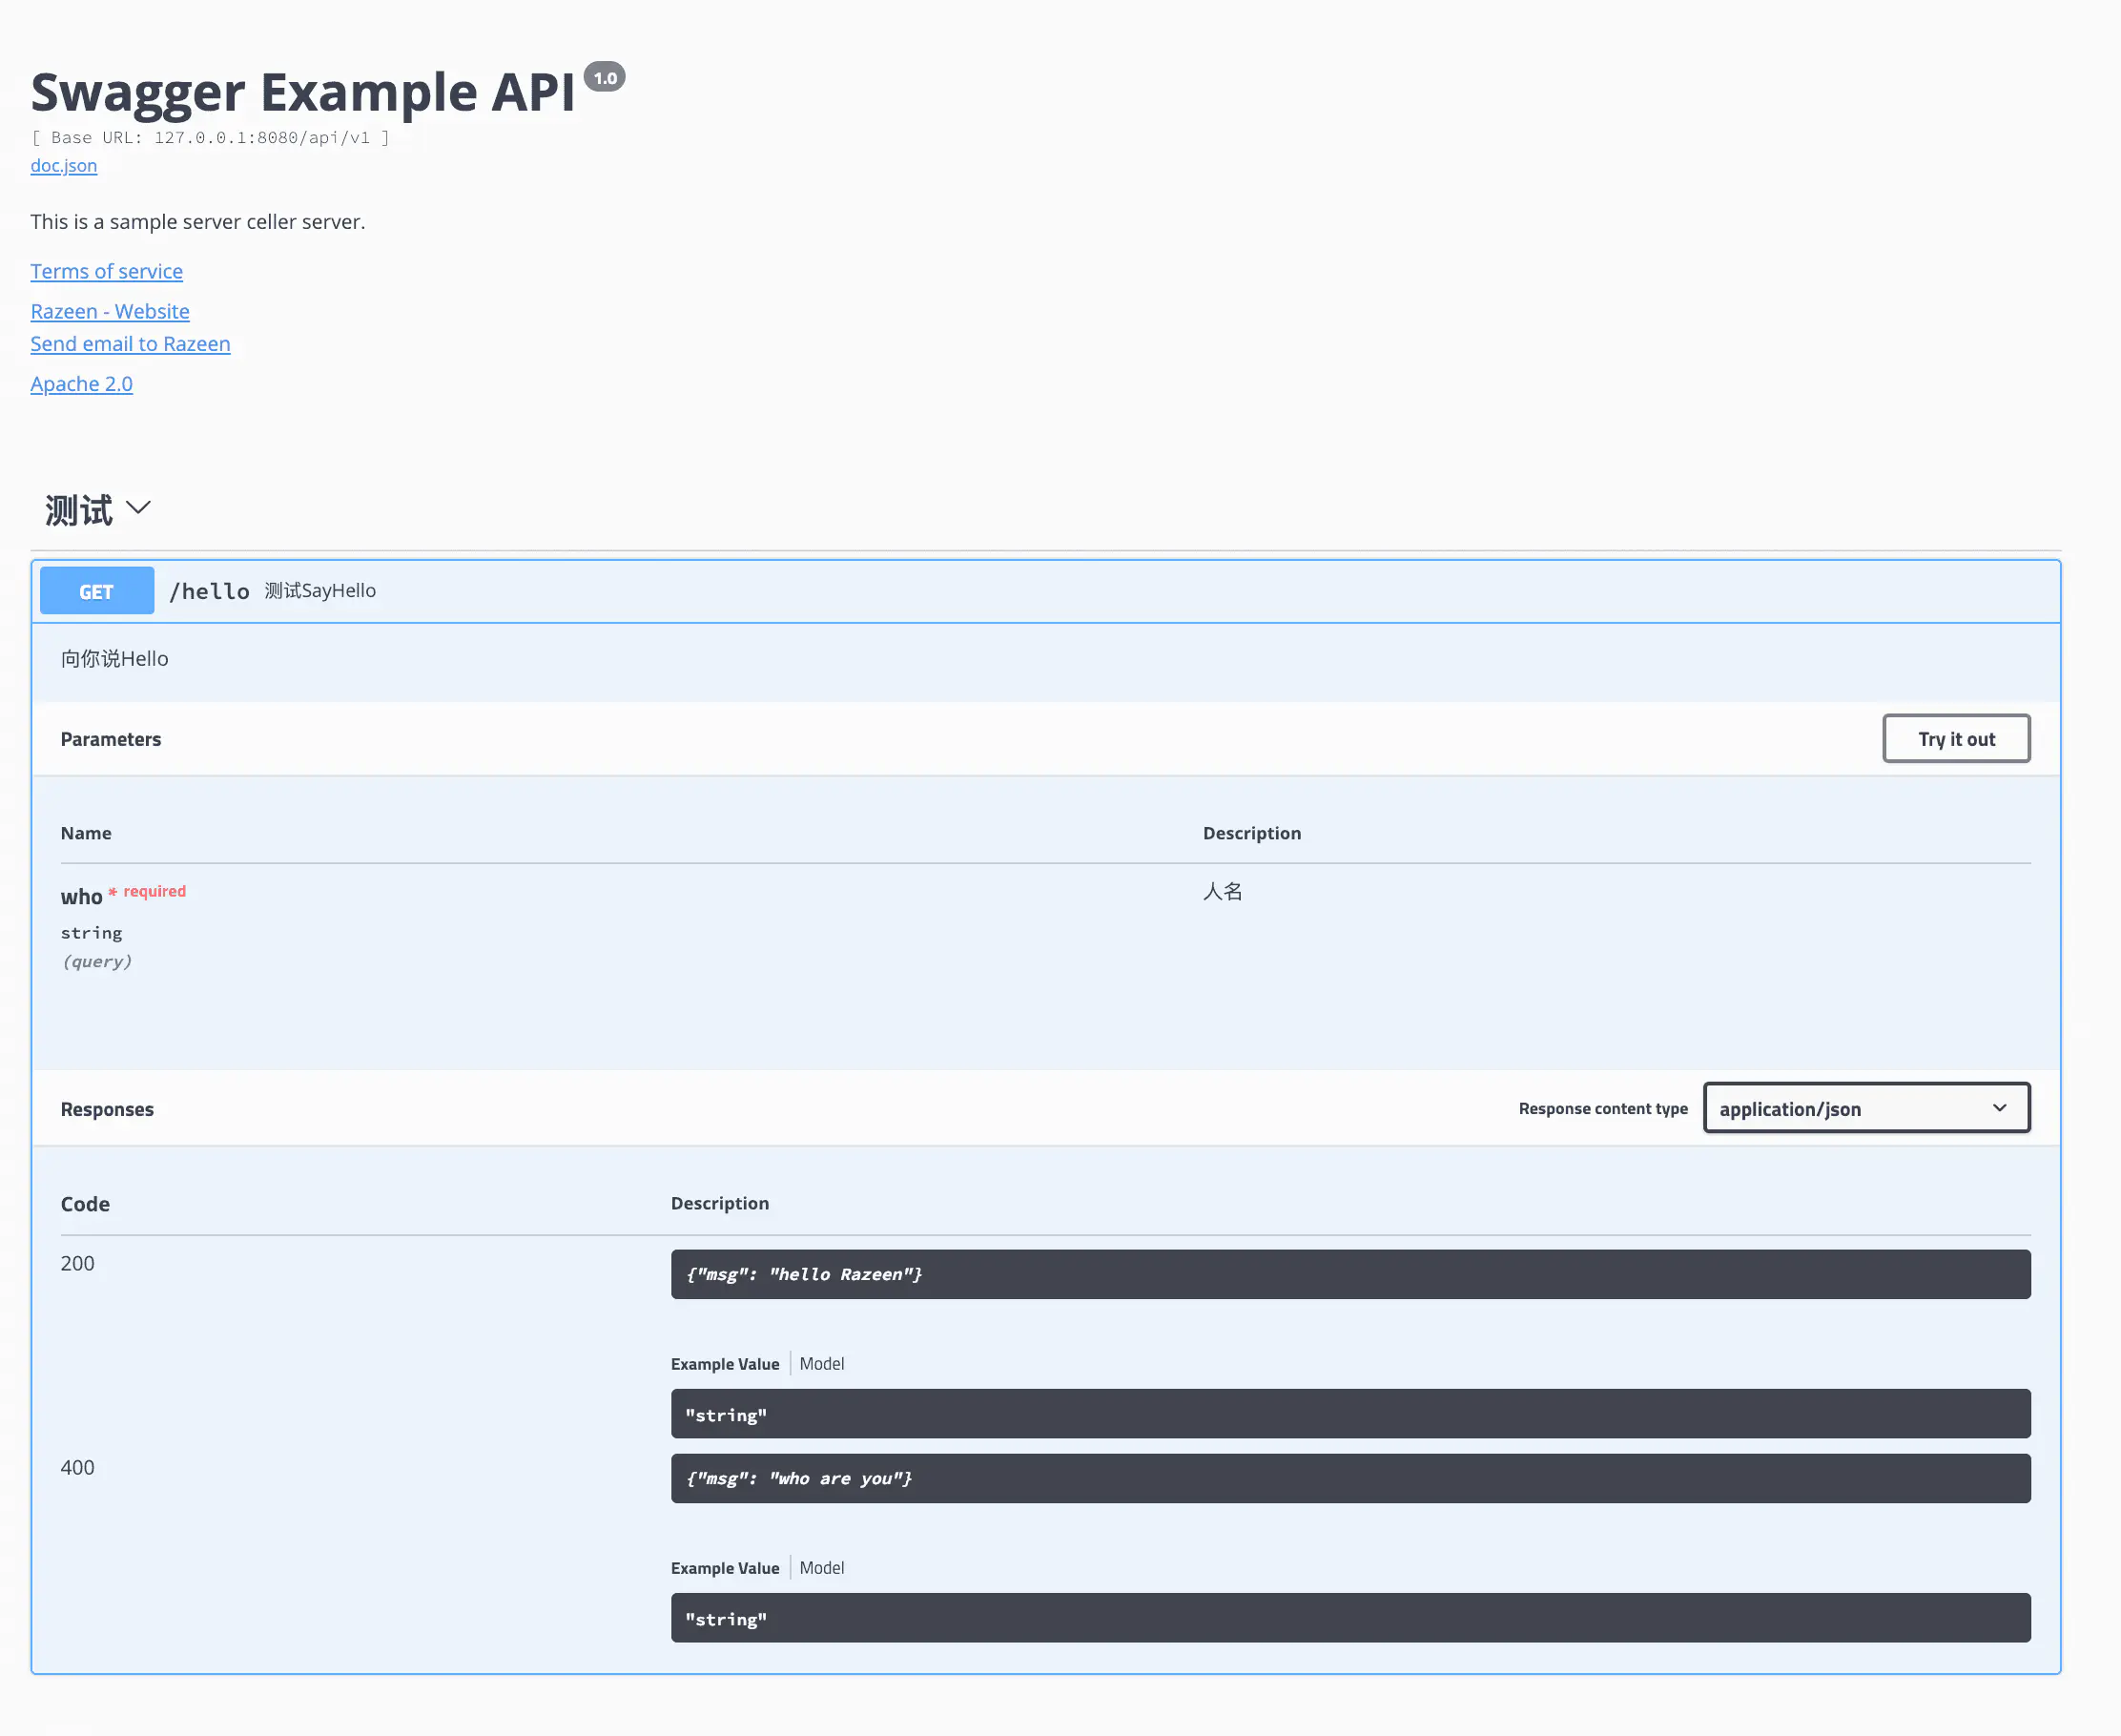
我们再次swag init, 运行一下。swaggo

此时,该API的相关描述已经生成了,我们点击Try it out还可以直接测试该API。swaggo
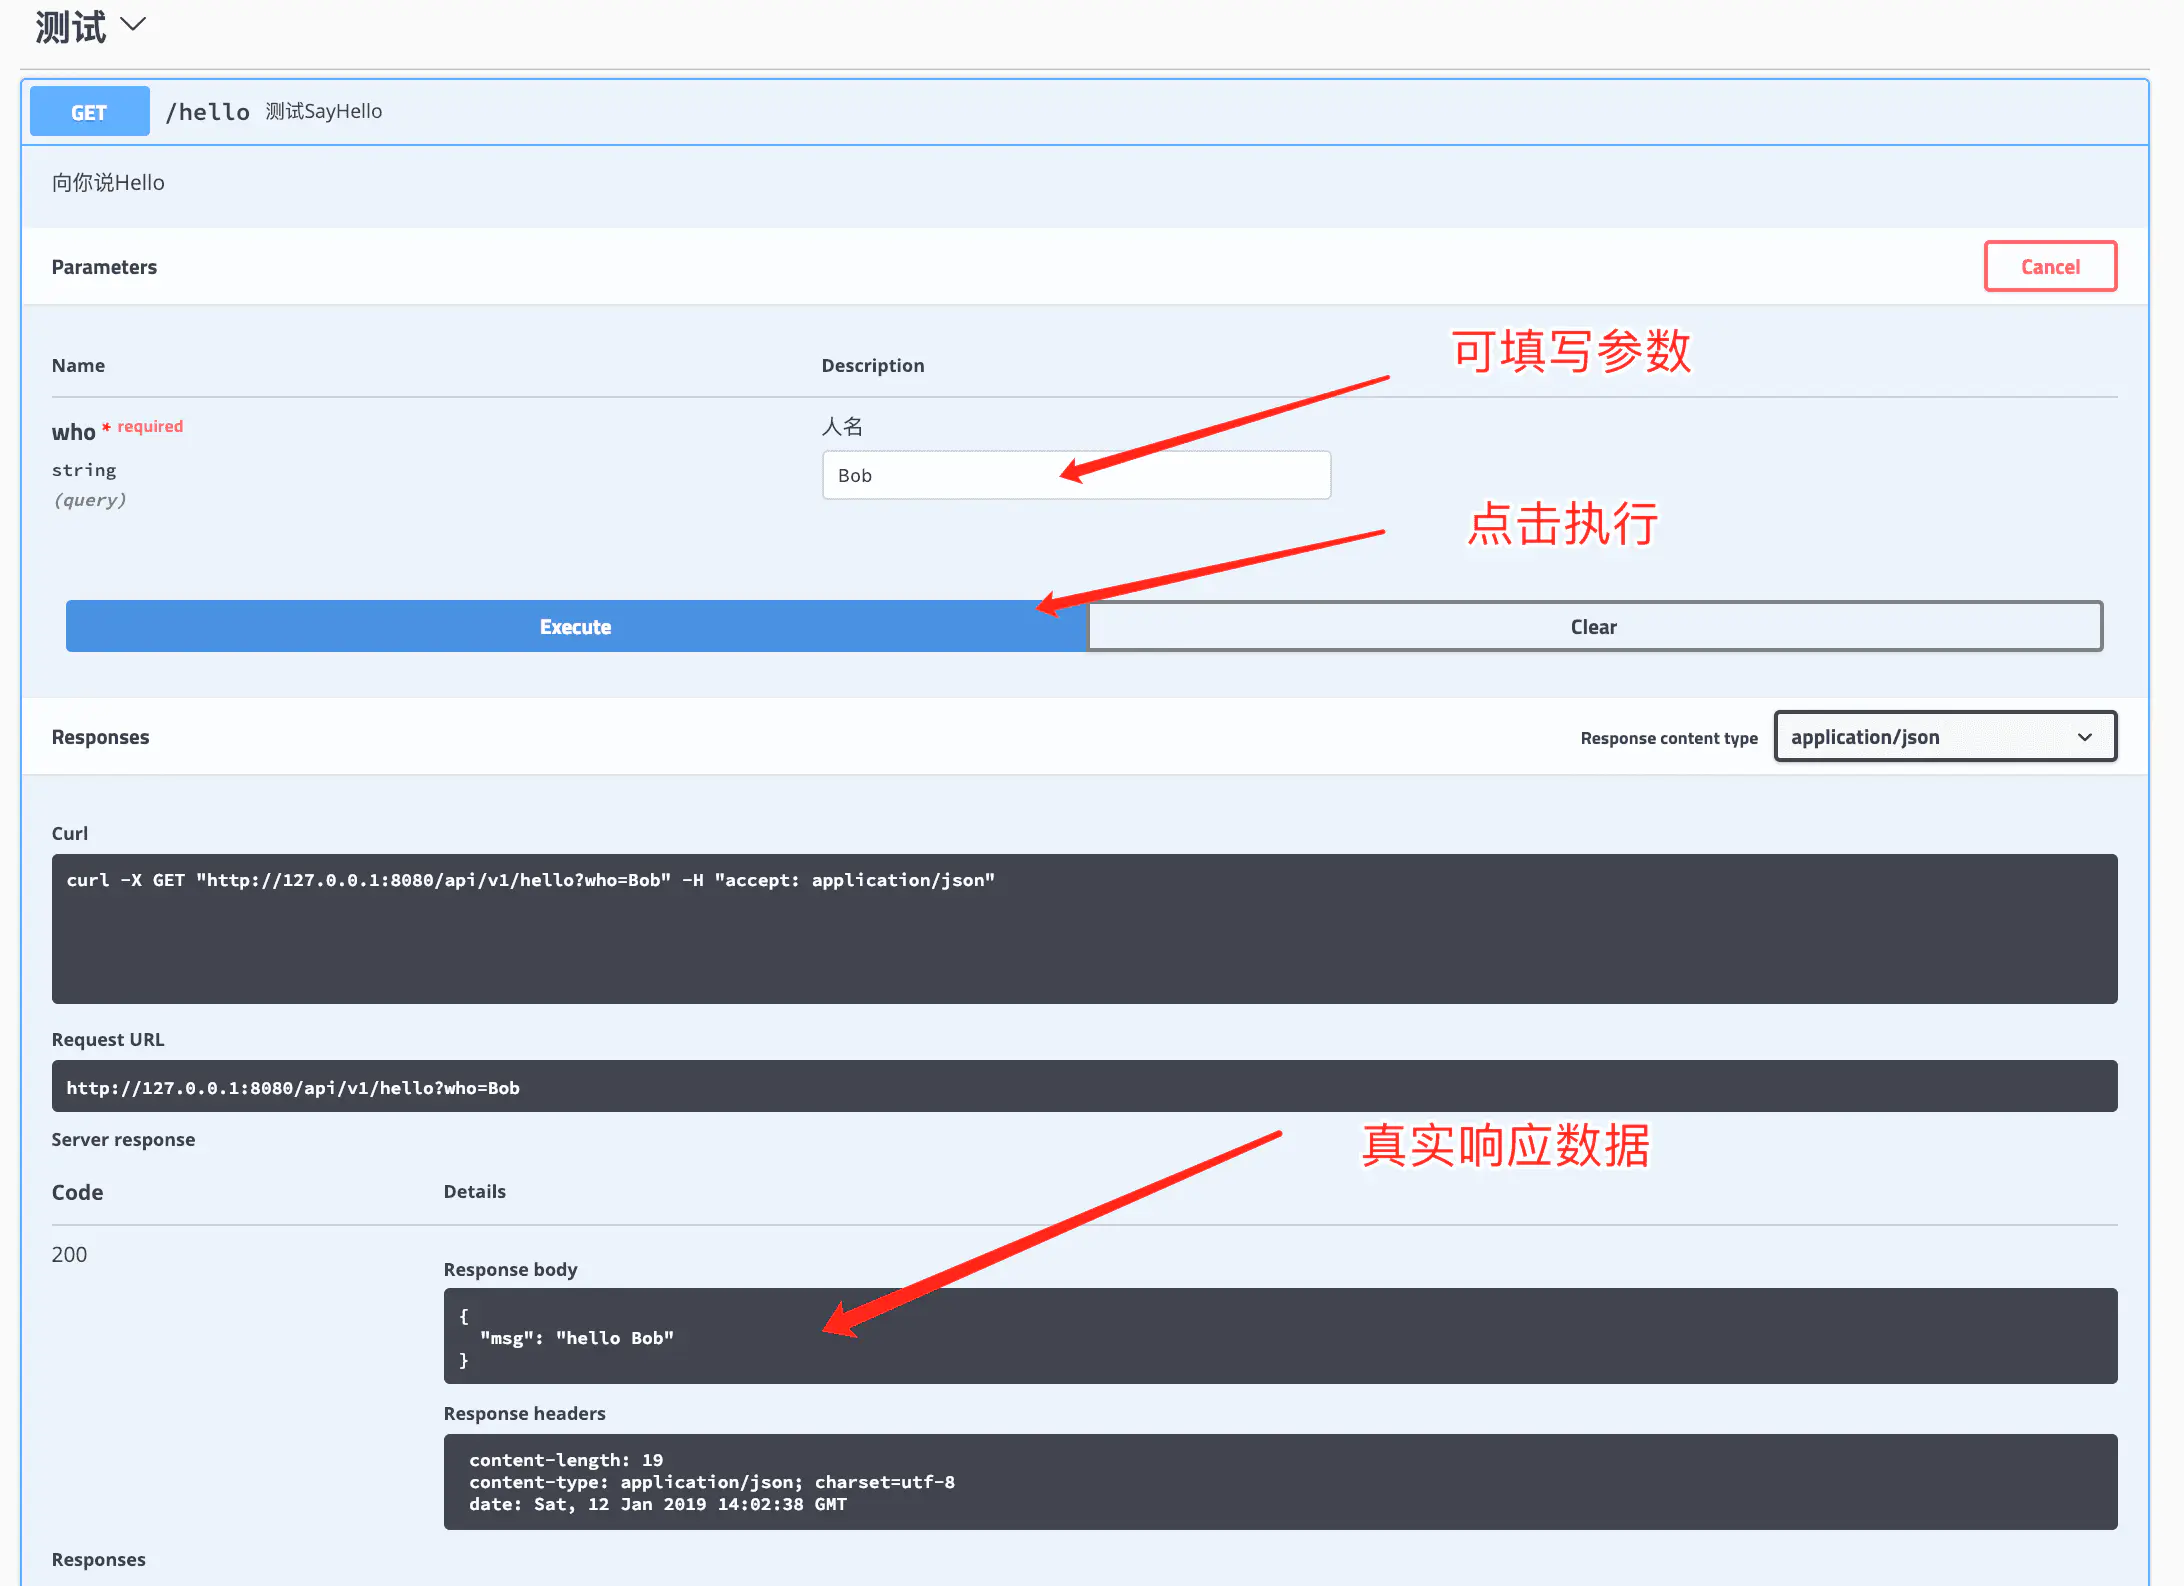
是不是很好用,当然这并没有结束,这些注释字段,我们一个个解释。swaggo

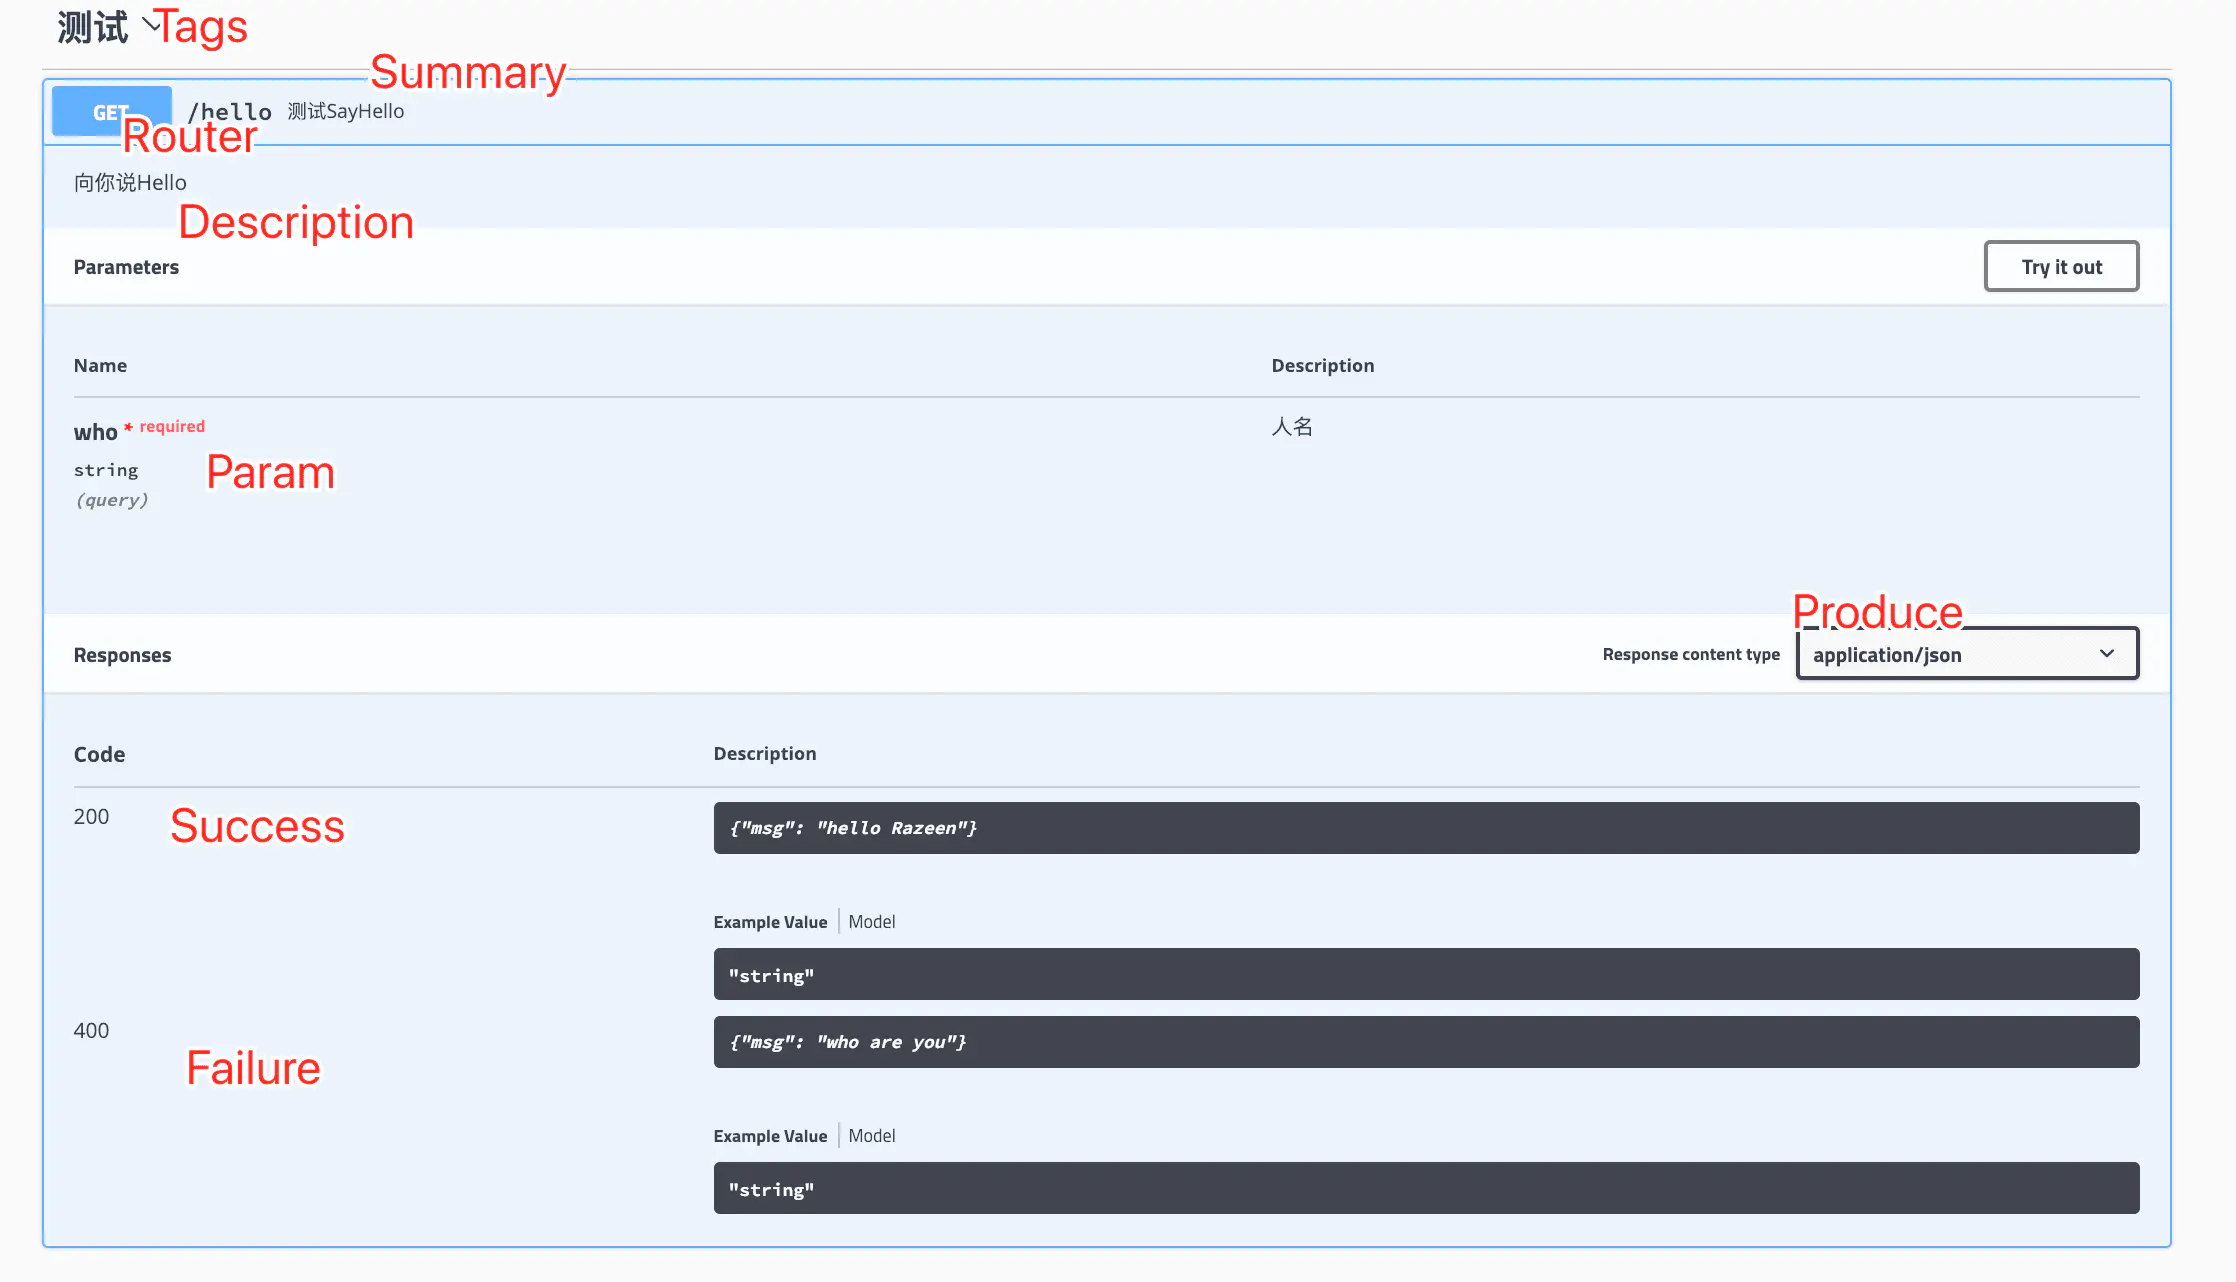
这些注释对应出现在API文档的位置,我在上图中已经标出,这里我们主要详细说说下面参数:

Tags

Tags 是用来给API分组的。

Accept

接收的参数类型,支持表单(mpfd) 和 JSON(json)

Produce

返回的数据结构,一般都是json, 其他支持如下表:

Mime Type 声明
application/json json
text/xml xml
text/plain plain
html html
multipart/form-data mpfd
application/x-www-form-urlencoded x-www-form-urlencoded
application/vnd.api+json json-api
application/x-json-stream json-stream
application/octet-stream octet-stream
image/png png
image/jpeg jpeg
image/gif gif

Param

参数,从前往后分别是:

@Param 1.参数名 2.参数类型 3.参数数据类型 4.是否必须 5.参数描述``6.其他属性

  • 1.参数名

    参数名就是我们解释参数的名字。

  • 2.参数类型

    参数类型主要有三种:

    • path 该类型参数直接拼接在URL中,如DemoHandleGetFile

      1
      // @Param id path integer true "文件ID"
    • query 该类型参数一般是组合在URL中的,如DemoHandleHello

      1
      // @Param who query string true "人名"
    • formData 该类型参数一般是POST,PUT方法所用,如DemoHandleLogin

      1
      // @Param user formData string true "用户名" default(admin)
  • 3.参数数据类型

    数据类型主要支持一下几种:

    • string (string)
    • integer (int, uint, uint32, uint64)
    • number (float32)
    • boolean (bool)

    注意,如果你是上传文件可以使用file, 但参数类型一定是formData, 如下:

    1
    // @Param file formData file true "文件"
  • 4.是否是必须

    表明该参数是否是必须需要的,必须的在文档中会黑体标出,测试时必须填写。

  • 5.参数描述

    就是参数的一些说明

  • 6.其他属性

    除了上面这些属性外,我们还可以为该参数填写一些额外的属性,如枚举,默认值,值范围等。如下:

    1
    2
    3
    4
    5
    6
    7
    8
    9
    10
    11
    枚举
    // @Param enumstring query string false "string enums" Enums(A, B, C)
    // @Param enumint query int false "int enums" Enums(1, 2, 3)
    // @Param enumnumber query number false "int enums" Enums(1.1, 1.2, 1.3)

    值添加范围
    // @Param string query string false "string valid" minlength(5) maxlength(10)
    // @Param int query int false "int valid" mininum(1) maxinum(10)

    设置默认值
    // @Param default query string false "string default" default(A)

    而且这些参数是可以组合使用的,如:

    1
    // @Param enumstring query string false "string enums" Enums(A, B, C) default(A)

    Success

指定成功响应的数据。格式为:

// @Success 1.HTTP响应码 {2.响应参数类型} 3.响应数据类型 4.其他描述

  • 1.HTTP响应码

    也就是200,400,500那些。

  • 2.响应参数类型 / 3.响应数据类型

    返回的数据类型,可以是自定义类型,可以是json。

    • 自定义类型

    在平常的使用中,我都会返回一些指定的模型序列化JSON的数据,这时,就可以这么写:

    1
    // @Success 200 {object} main.File

    其中,模型直接用包名.模型即可。你会说,假如我返回模型数组怎么办?这时你可以这么写:

    1
    // @Success 200 {anrry} main.File
    • json

    将如你只是返回其他的json数据可如下写:

    1
    // @Success 200 {string} json ""
  • 4.其他描述

    可以添加一些说明。

Failure

同Success。

Router

指定路由与HTTP方法。格式为:

// @Router /path/to/handle [HTTP方法]

不用加基础路径哦。

1.1.4. 生成文档与测试

其实上面已经穿插的介绍了。

main.go下运行swag init即可生成和更新文档。

点击文档中的Try it out即可测试。 如果部分API需要登陆,可以Try登陆接口即可。

1.1.5. 优化

看到这里,基本可以使用了。但文档一般只是我们测试的时候需要,当我的产品上线后,接口文档是不应该给用户的,而且带有接口文档的包也会大很多(swaggo是直接build到二进制里的)。

想要处理这种情况,我们可以在编译的时候优化一下,如利用build tag来控制是否编译文档。

main.go声明swagHandler,并在该参数不为空时才加入路由:

1
2
3
4
5
6
7
8
9
10
11
12
13
14
15
package main

//...

var swagHandler gin.HandlerFunc

func main(){
// ...

if swagHandler != nil {
r.GET("/swagger/*any", swagHandler)
}

//...
}

同时,我们将该参数在另外加了build tag的包中初始化。

1
2
3
4
5
6
7
8
9
10
11
12
13
14
// +build doc

package main

import (
_ "github.com/razeencheng/demo-go/swaggo-gin/docs"

ginSwagger "github.com/swaggo/gin-swagger"
"github.com/swaggo/gin-swagger/swaggerFiles"
)

func init() {
swagHandler = ginSwagger.WrapHandler(swaggerFiles.Handler)
}

之后我们就可以使用go build -tags "doc"来打包带文档的包,直接go build来打包不带文档的包。

你会发现,即使我这么小的Demo,编译后的大小也要相差19M !

1
2
3
4
5
6
swaggo-gin git:(master) ✗ go build
swaggo-gin git:(master) ✗ ll swaggo-gin
-rwxr-xr-x 1 xxx staff 15M Jan 13 00:23 swaggo-gin
swaggo-gin git:(master) ✗ go build -tags "doc"
swaggo-gin git:(master) ✗ ll swaggo-gin
-rwxr-xr-x 1 xxx staff 34M Jan 13 00:24 swaggo-gin

文章到这里也就结束了,完整的Demo地址在这里

1.1.6. 使用token

如果你的程序中使用了token中间键,只需要添加下面两行注释即可

1
2
// @Security x-token
// @param x-token header string true "Authorization"

Swag
http://example.com/2022/07/27/Swag/
Author
WYX
Posted on
July 27, 2022
Licensed under